Tonight I applied the third layer of glass, preceded by strategic additional patches to increase thickness in a few low points.
 This morning I cut the pod free from where the excess cloth had welded itself to the newspaper.
 And this evening started the sanding process. The low glassy areas between patches are clearly apparent.
Spent a highly enjoyable afternoon at Logan McLean's flyin, Kaukapakapa.
Collected more resin and cloth this morning, and a container of milled glass fibre strands, which will be used to form the lip for the panel and the mounting points.
 It's been a full week since Bax were supposed to pickup my shipment from StarBee, and apparently haven't. Grrgh.
More sanding tonight, and draping and cutting the cloth for layer #4.
Collected an SC-103 strobe light from Aeroware this evening, and the antenna was delivered today.

Just had to test it.
And apparently two crates left StarBee on the 4th.
Bought some more plastic measuring cups for the resin, but tonight I decided not proceed with a fourth layer of cloth. By the time the pod has several layers of fairing compound applied to it, I think it'll be quite rigid enough.
 Accordingly, I mixed up a fairly runny batch of fairing compound and slathered it all over the pod.
There's a lot of run-off, and strictly speaking it should have been thicker, but I want the outer
layers as strong as possible, even if this means repeating the process several times.
When the goo had almost gelled, I scraped up some of the excess and filled in the voids with it.
Accordingly, I mixed up a fairly runny batch of fairing compound and slathered it all over the pod.
There's a lot of run-off, and strictly speaking it should have been thicker, but I want the outer
layers as strong as possible, even if this means repeating the process several times.
When the goo had almost gelled, I scraped up some of the excess and filled in the voids with it.
This is clearly going to be an iterative affair...
Due to a mixup at Bax, the two crates from StarBee have been sitting in Boston for the last week. Arrgh.
 We're almost there. The fairing compound sanded up beautifully tonight, with all the major voids filled.
I'm now confident that a smooth rock-solid surface CAN actually be achieved.
We're almost there. The fairing compound sanded up beautifully tonight, with all the major voids filled.
I'm now confident that a smooth rock-solid surface CAN actually be achieved.
Yet another batch of fairing compound. This time I let the stuff sit in the mixing cup for ten minutes, and parked the pod out in the sun to apply the goo and cure. Much less run-off. I did however have to chase the afternoon sun around the yard, and remove the occasional fly.


No, the side of the pod is not soggy, it's a trick of the light.
Apparently the crates are now "in transit" from JFK.
More sanding.
Collected two crates from Bax this afternoon. Only one would actually fit in the car, so the contents of the other were transferred piece-by-piece, and the crate itself left at Bax.


Apart from everything else, I ordered the hardware kit... which comes bagged-up by build phase.

Only things not in the crate are the tail-section and main axle inserts, both on back-order. StarBee also sent me a free T-shirt :)
Discovered this evening that the two cluster plates supplied don't quite match. StarBee are forwarding replacements immediately.
Disaster.
Of the various struts I've fabricated (engine bearers, fuel-tank mount and seat braces), there's not one pair whose' holes line up enough to bolt cleanly together. I'm going to have to re-do everything, and rethink my approach to drilling. The problem seems to be relative rather than absolute accuracy, and I think ruthless clamping and match-drilling will solve it. One thing becomes apparent - you have to thoroughly understand what each part is going to bolt to, and in what sequence, and how each hole derives its position.
This is definitely the lowest point of the project so far.
Went out and bought three rubber-faced clamps, more aluminium angle, and a pile of 1/4" and 3/16" nylock nuts. You can't seem to get imperial-sized bolts in the hardware stores here; so all the taking apart and putting back togther will have to be done using the real AN-grade hardware. I've also acquired a bottle of red nail polish, which works exceedingly well as a substitute for engineer's layout dye.
More sanding, and put another layer of fairing compound on the pod.
 Sanded down the pod, mixed up an exceptionally thick batch of fairing compound, and filled the last minor voids. Almost there.
Phase II - devise a new approach for accurate drilling. Process improvements include using scriber marks in "layout dye", (otherwise known as nail polish) and an automatic one-handed centre punch with a significantly finer point than it's hammer-driven predecessor.


 To guarantee an absolute match between pairs of holes in the seat braces, I clamped them together and drilled both
in one operation. Unfortunately, all this wasn't enough to produce a clean fit, turns out there's at least 1/8"
discrepancy between the plans and the actual distance between the holes in the keel and the mast, with the mast sitting
naturally upright on the keel. With the braces installed, the mast is tilted forward by a fraction of a degree.
I'm going to wait for the replacement cluster plates to arrive, and see what happens. I may have to fabricate another seat of braces off the
actual measured distance with the mast bolted to the keel.
To guarantee an absolute match between pairs of holes in the seat braces, I clamped them together and drilled both
in one operation. Unfortunately, all this wasn't enough to produce a clean fit, turns out there's at least 1/8"
discrepancy between the plans and the actual distance between the holes in the keel and the mast, with the mast sitting
naturally upright on the keel. With the braces installed, the mast is tilted forward by a fraction of a degree.
I'm going to wait for the replacement cluster plates to arrive, and see what happens. I may have to fabricate another seat of braces off the
actual measured distance with the mast bolted to the keel.

Sanded down the last application of fairing compound on the pod, repeated with 220-grit, and then spent the next hour removing it from the mould - which involved drilling a hole in the base and pouring acetone into it to dissolve away the polystyrene. To extract the MDF base itself I had to resort to hacksawing a corner away. Another hour was spent scraping out polystyrene goo, and I discovered a thin patch which I'll have to throw a couple of layers of glass on, from the inside.


Experimented with using Super Glue to clamp aluminium together for drilling - there's a couple of places where normal clamps just won't go. The glue works very well.
Inspected the thin patch in the pod, and realised there was only one layer of glass left - the rest had been sanded away. Patched on the inside with three layers of glass.
Cut four pieces of the replacement fuel-tank mount to length; two of them recycled from the old mount.
The propeller is on it's way, last seen at the UPS facility in Louisville, Kentucky.
Trimmed the edge of the pod, and experimented (inconclusively) with building a cardboard dam to mould the lip in.
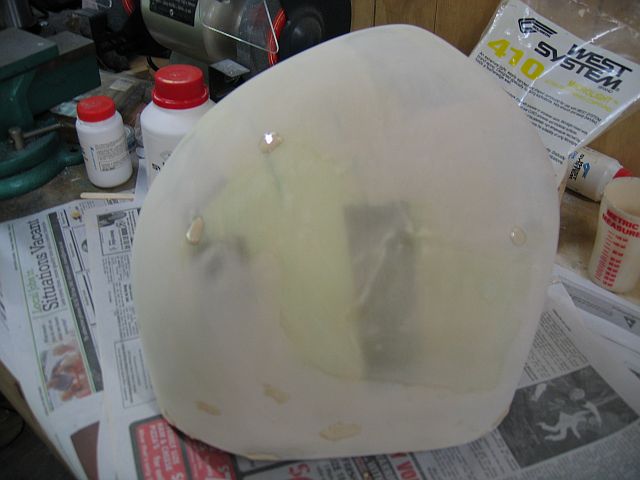
I realised while sitting in traffic that the easiest way to mould in a lip and mounting points would be to use more polystyrene. I cut out two cross-sections and laminated them together. After some work with the hot-wire cutter, I mixed up a batch of epoxy and milled glass fibre (particularly nasty stuff made by chopping up glass cloth) and essentially *cast* the lip and the mounting points in one operation.


I was surprised, but shouldn't have been, at how just hot the pod became as the thick casting cured.
UPS tell me the propeller has arrived but still has to clear Customs.
Cut the remaining four lengths for the fuel tank mount, and matched-drilled the four "corner" holes.
 Match drilled the mast attachment points for the diagonal and horizontal struts.
I then clamped and pilot drilled the joint between one horizontal and diagonal, and then used the pilot holes
to match-drill the horizontal and diagonal struts in pairs.
The outer frame was clamped and drilled at the aft attach points.
Match drilled the mast attachment points for the diagonal and horizontal struts.
I then clamped and pilot drilled the joint between one horizontal and diagonal, and then used the pilot holes
to match-drill the horizontal and diagonal struts in pairs.
The outer frame was clamped and drilled at the aft attach points.

The tank mount continues - clamped and drilled the forward attach points, and then completed the final streamlining cuts. Phase 7 complete.


This morning I paid the GST (ugh!) on the propeller, which turned up at about 8:00pm.


Cut to length the first four pieces of angle for the rudder pedals, recycled from the previous incarnation of the tank mount.
Utterly whacked this evening, but decided to cut at least one more piece of angle, on principle.

